“Nice Hotel” Documentation by “Quite Nice Stuff” v1.9.9
“Nice Hotel”
Created: 26/12/2012
By: Quite Nice Stuff
Email: help@quitenicestuff.com
Thank you for purchasing my theme. If you have any questions that are beyond the scope of this help file, please feel free to email via my user page contact form here. Thanks so much!
Table of Contents
A) Installation - top
The steps for installing the theme below assume that you've already got WordPress installed and running on your web server, if thats not the case please go to The Wordpress website for a full guide explaining how to install WordPress.
Installing The Theme
- First, unzip the package you got from Themeforest, inside will be a bunch of folders, the one which contains the theme is called "nice_hotel"
- Upload/copy the "nice_hotel" folder to "wp-content/themes"
- Now login to the Wordpress admin panel
- Go to "Appearance > Themes"
- Click "Activate" for the "Nice hotel" theme, and you're done!
Uh oh! I get an Error when Installing!
Fatal error: Call to undefined function wp_get_theme() in /home/hotel/public_html/wordpress/wp-content/themes/nice_hotel/admin/index.php on line 35
You're getting this error because you've got an old version of WordPress, the "wp_get_theme()" function is relatively new so you’ll get the "undefined" error in old versions of WP. Go to http://wordpress.org/ and grab the latest version and it should be all good
The package could not be installed. The theme is missing the style.css stylesheet
You're getting this error message because you're uploading the wrong folder, make sure you unzip the zip file you downloaded from Themeforest. See the installation instructions above for more details.
B) Getting Started - top
Import Dummy Data
Some dummy data has been included to help you get started, its not identical to the demo site but hopefully it'll give you a general idea of how things work. If you run into any problems replicating something you've seen on the demo site feel free to send me a message via my user page on ThemeForest, I'll be more than happy to help.
- Firstly you need to install the WordPress Importer Plugin
- Now go to "Tools" > "Import" > "WordPress" and select the "nicehotel.wordpress.2012-07-20.xml" file from the "Import Data" folder
- Next go to "Appearance" > "Theme Options" and click on the "Backup Options" tab. Now open the "theme-options.txt" file also found in the "Import Data" folder and paste the contents into the "Transfer Theme Options Data" field and click "Import Options" then click "Save"
- Go to "Appearance" > "Menus", for the Primary Navigation select "Main Menu", for the Secondary Navigation select "Top Menu", for the Footer Navigation select "Footer Menu" and click save.
Two menus display in the main menu after installing the dummy data
To fix this go to "Appearance > Menus" and set the "Main Menu" as the "Primary Navigation"
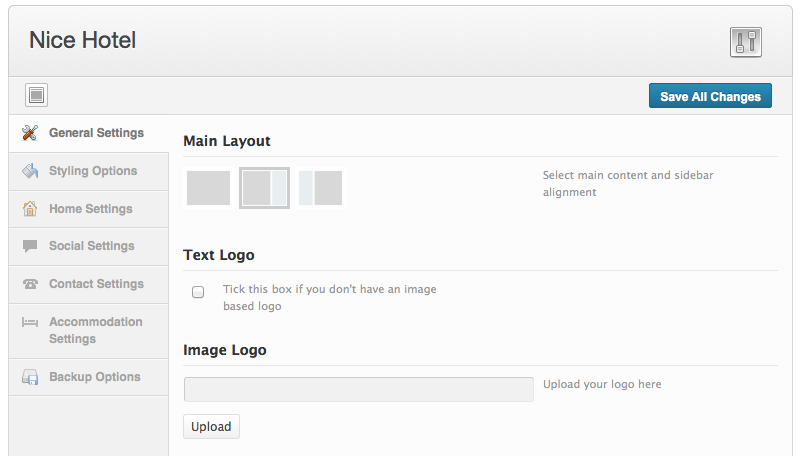
Add your Logo
- Go to "Appearance > Theme Options"
- Click on the "General Settings" Tab
- In the area labelled "Image Logo" click "Upload" and find your logo
- Click "Use This Image"
- Click "Save Options"
- If you don't have a logo tick the box labelled "Text Logo"
Pick a Colour Scheme
- Go to "Appearance > Theme Options"
- Click on the "Styling Options" Tab
- Click on the drop down labelled "Base Colour" and select an option
- Click "Save Options"
Add a Contact Form Email Address
- Go to "Appearance > Theme Options"
- Click on the "Contact Settings" Tab
- In the area labelled "Contact Form Email" enter your email address
- Click "Save Options"
Accommodation booking form
For the accommodation booking form to work you will need to create a page using the "Booking" template. you shouldn't add this page to any menus, it just needs to exist there so that the accommodation form can use it when a booking request goes through.
- Go to "Pages > Add New"
- Add the title "Booking" (it doesn't really matter what you call it)
- Select the page template "Booking" (this is important!)
- Click "Publish"
- OK, now go to "Appearance > Theme Options" and click on the "Accommodation Settings" tab
- Add the full booking page URL to the "Booking Page URL" field and click "Save all changes" - Done!
Getting the smaller text to appear under main menu items
- Go to "Appearance > Menus"
- Click on the "Screen Options" in the top right corner of the screen
- Tick the box labelled "Description"
- Now when you add a new menu item there will be a box labelled "Description", add the smaller text in this box
C) Shortcodes - top
C.1) Accordion
[accordion]
[panel title="The Title"]...[/panel]
[panel title="The Title"]...[/panel]
[panel title="The Title"]...[/panel]
[/accordion]
C.2) Buttons
[button type=small link_url="http://google.com"]...[/button]
[button type=medium link_url="http://google.com"]...[/button]
[button type=large link_url="http://google.com"]...[/button]
[button background_color="#000" text_color="#fff" link_url="http://google.com"]...[/button]
C.3) Columns
There are 2, 3 and 4 column layouts to pick from. For the last column in the row you should add "-last" to the tag, see below for an example
[one_half]...[/one_half]
[one_half_last]...[/one_half_last]

[one_third]...[/one_third]
[one_third]...[/one_third]
[one_third_last]...[/one_third_last]

[one_forth]...[/one_forth]
[one_forth]...[/one_forth]
[one_forth]...[/one_forth]
[one_forth_last]...[/one_forth_last]
C.4) Drop Caps
[dropcap]...[/dropcap]
C.5) Google Map
[googlemap width="50%" zoom=14 marker_address="London, England"]
Shortcode Options
- width: Any px or % value
- height: Any px or % value
- latitude: Latitude value (optional to marker_address)
- longitude: Longitude value (optional to marker_address).
- maptype: ROADMAP, SATELLITE, HYBRID, TERRAIN
- zoom: Zoom value from 1 to 19
- marker_latitude: Marker latitude value (optional to marker_address)
- marker_longitude: Marker longitude value (optional to marker_address)
- marker_address: Address of marker
- marker_popup: Can be set to true or false
- marker_html: HTML to be displayed in the marker popup
- pan_control: Can be set to true or false
- zoom_control: Can be set to true or false
- map_type_control: Can be set to true or false
- scale_control: Can be set to true or false
- street_view_control: Can be set to true or false
- overview_map_control: Can be set to true or false
C.6) List
[list type="arrow"]
[li]...[/li]
[li]...[/li]
[li]...[/li]
[/list]
Shortcode Options
- type: circle, arrow, cross, tick or just use [list] without type specified to use a standard bullet point style
C.7) Alert Message
[msg type=default]...[/msg]
Shortcode Options
- type: default, notice, success, fail
C.8) Tabs
[tabs_container]
[tab title="..."]...[/tab]
[tab title="..."]...[/tab]
[tab title="..."]...[/tab]
[/tabs_container]
C.9) Toggle
[toggle title="..."]...[/toggle]
C.10) Video
[video type=youtube id=PwdA0uOmrzM hd=false width="100%" height="215px"]
[video type=vimeo id=4090686 hd=true width="100%" height="215px"]
Shortcode Options
- type: youtube or vimeo
- id: video id
- hd: true or false
- width: Any px or % value
- height: Any px or % value
C.11) Photo Gallery
[gallery columns="4"]
Shortcode Options
- columns: any number between "1" and "9"
Additional Instructions
To insert a photo gallery, go to "Pages > Add New", then click the "Add Media" button, a popup will appear, click "Create Gallery", upload some images or select some already in your media library, then click the blue "Create a New Gallery" in the bottom right corner, then click "Insert Gallery" and you're done!
D) Theme Options - top
All the theme options contain a pretty good explanation so it's not necessary to repeat them here. To access the theme options go to "Appearance > Theme Options".
E) Adding Content - top
E.1) Page Templates
This theme comes with a collection of page templates, to use them create a new page (Pages > Add New) and then use the drop down menu labelled "Template" on the right side of the page. The templates available are:
- Default Template
- Accommodation
- Blog
- Booking
- Contact Us
- Events
- Full Width
- Homepage
- Left Sidebar
- Right Sidebar
- Photo Gallery
- Testimonials
E.2) Homepage
Explanations about each of the numbers in the screenshot can be found below
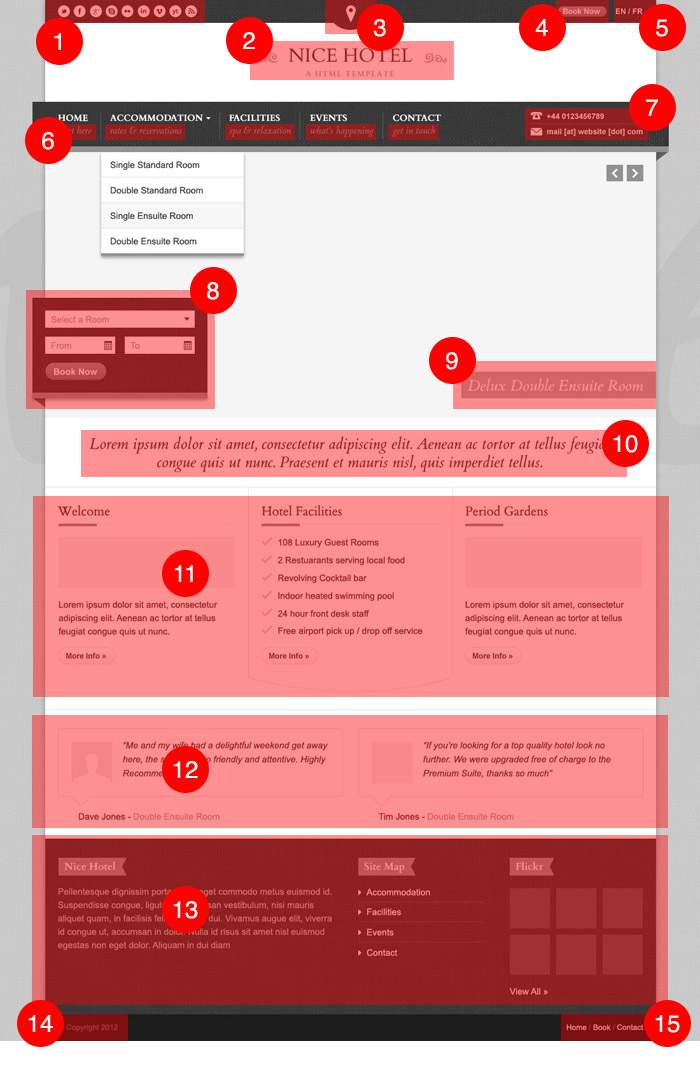
1.) Social Icons
- Go to "Appearance > Theme Options > Social Settings"
- Enter the website URL in the appropriate field
2.) Logo
- Go to "Appearance > Theme Options > General Settings"
- Upload your logo in the "Image Logo" field
3.) Map
- Go to "Appearance > Theme Options > Contact Settings"
- Tick "Display Google Map In Top Bar" to switch the map on/off
- Change the map address using the "Google Map Latitude" and "Google Map Longitude" fields
4.) Book Now Button
- Go to "Appearance > Theme Options > General Settings"
- Tick "Display Button In Top Right Bar" to switch the button on/off
- Enter the button text in the "Top Right Button Text" field
- Enter the button link in the "Top Right Button Link" field
5.) Top Right Menu
- Go to "Appearance > Menus"
- Create a menu and set it as the "Secondary Navigation"
- If you want to display translation options in this menu you will need to the http://wpml.org plugin to translate your theme, you can then set the WPML translation controls to display in the "Secondary Navigation" menu
6.) Sub Menu Title
- Go to "Appearance > Menus"
- Click on the "Screen Options" in the top right corner of the screen
- Tick the box labelled "Description"
- Now when you add a new menu item there will be a box labelled "Description", add the smaller text in this box
7.) Contact Details in Menu
- Go to "Appearance > Theme Options > Contact Settings"
- Tick or untick "Display phone number and email in navigation bar"
- Enter the phone number in the "Phone Number" field
- Enter the email address in the "Email Address" field
8.) Slideshow Booking Form
- To switch the display of this form on/off go to "Appearance > Theme Options > Home Settings" and tick/untick "Display Booking Form on Slideshow"
9.) Slide Caption Colour
- To change the semi transparent background colour of the slideshow caption go to "Appearance > Theme Options > Styling Options"
- Then add colour in the "Main Highlight Colour in RGBA format" field
- Use http://hex2rgba.devoth.com to find out your colour in RGBA format
- Set the transparency to 70% if you want the same transparency as shown in the demo
10.) Homepage Announcement Text
- Go to "Appearance > Theme Options > Home Settings"
- Enter the text in the "Announcement Message" field
11.) Homepage Text Blocks
- Go to "Appearance > Theme Options > Home Settings"
- Enter the text in the "Block Title 1", "Block Content 1", "Block Button Title 1" and "Block Button Link 1" etc fields
12.) Display Testimonials
- Go to "Appearance > Theme Options > Home Settings"
- Enter the IDs of the testimonials you wish to display on the homepage separate by a comma in the "Testimonial IDs to Display on Homepage" field
- To find the ID of a testimonial go to "Testimonials", click on a testimonial and then your browse address will look something like: http://website.com/wp-admin/post.php?post=49&action=edit
- Where it says "post=49" 49 is the ID of the testimonial
13.) Footer Widgets
- Go to "Appearance > Widgets"
- Drag the widgets of your choice into the "Footer Widget Area"
14.) Footer Text
- Go to "Appearance > Theme Options > General Settings"
- Add the text in the "Footer Message" field
15.) Footer Menu
- Go to "Appearance > Menus" and create a menu
- Then set it as the "Footer Menu"
E.3) Accommodation
Make sure you setup the booking page, this is very important! (see the "getting started" section of the documentation), you should also setup the currency you want to quote your accommodation prices in by going to "Appearance > Theme Options > Accommodation Tab" and change the "Currency Unit" field. Then its simply a case of going to "Accommodation > Add New". You can add images for the accommodation by using the standard media uploader. Whatever you set as the featured image will be displayed on the main accommodation listing page, additional images will be viewable through a slideshow on the accommodation single page.
Explanations about each of the numbers in the screenshot can be found below
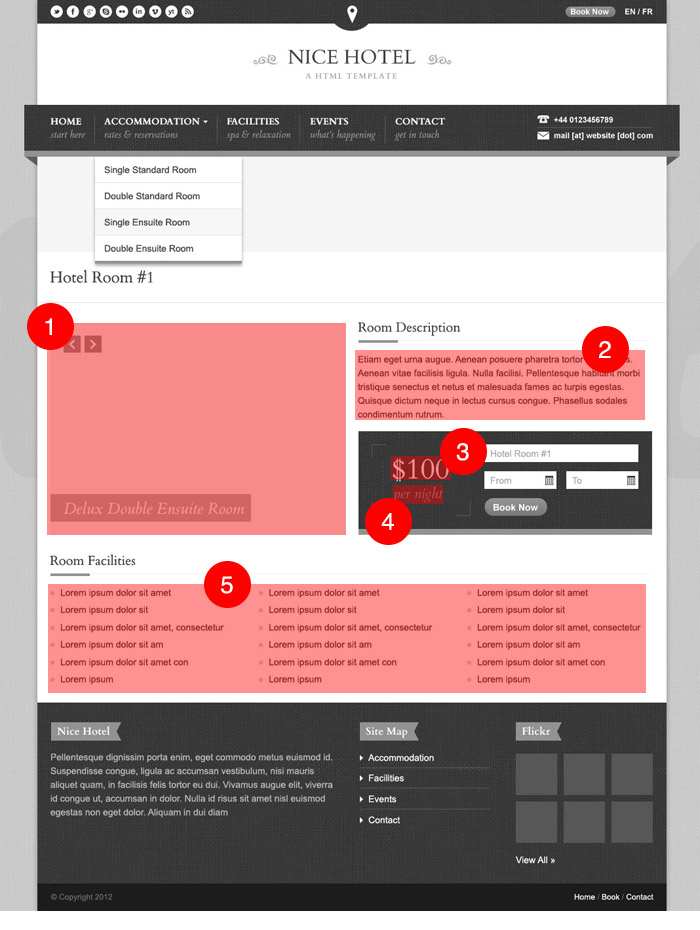
1.) Accommodation Slideshow
- Go to "Accommodation > Add New"
- Click "Upload/Insert" above the main text body field
- A pop up box will appear, you can upload as many photos as you like and they will be automatically formatted into a slideshow
- Do NOT click "Insert Into Post" when uploading images as this is not necessary
- The image you set as the "Featured Image" will be used on the accommodation listing page
2.) Accommodation Description
- Go to "Accommodation > Add New"
- Add this text in the large body text field
3.) Accommodation Description
- Go to "Accommodation > Add New"
- Add the price in the "Price" field
4.) Accommodation Price Info
- Go to "Accommodation > Add New"
- Add this in the "Price Info" field
5.) Accommodation Details
- Go to "Accommodation > Add New"
- Add this in the "Accommodation Details" field
E.4) Blog
Theres not much to explain here, set the blog as the page template and it will display all posts in blog format!
E.5) Contact Us
Set the email address the form sends to by going to "Appearance > Theme Options" and then click on the "Contact Settings" tab and entering the email in the field labelled "Contact Form Email".
F) Credits - top
I'd like to thank the people below for providing awesome resources.
- jQuery
- Slightly modified options framework by sy4mil
- prettyPhoto by Stephane Caron
- Superfish by Joel Birch
- Slides by Nathan Searles
- Cardo Font by David Perry
- Telephone Icon by The Noun Project
- Mail Icon by The Noun Project
- User Icon by The Noun Project
- Map Marker by The Noun Project
Once again, thank you so much for purchasing this theme. As I said at the beginning, I'd be glad to help you if you have any questions relating to this theme. No guarantees, but I'll do my best to assist. If you have a more general question relating to the themes on ThemeForest, you might consider visiting the forums and asking your question in the "Item Discussion" section.
Quite Nice Stuff